Skip to content
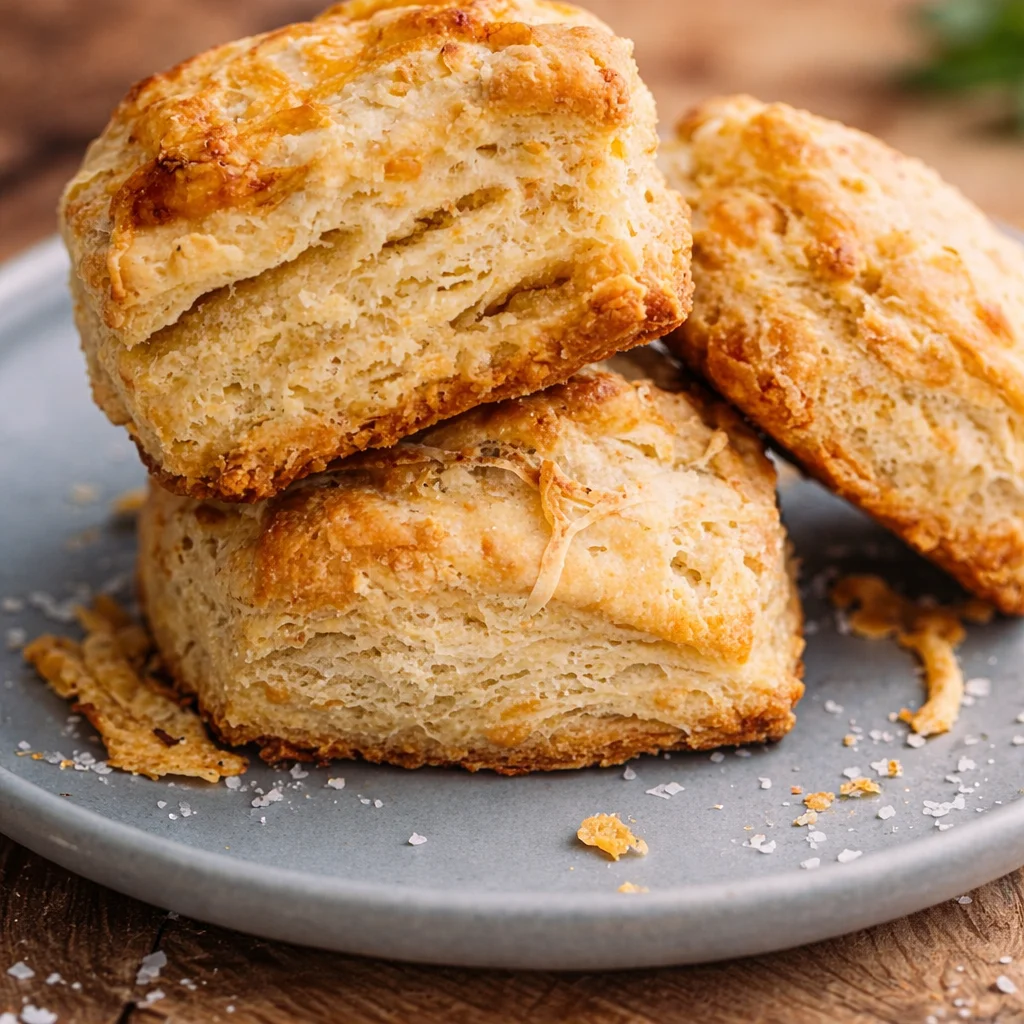
gluten free hotdog buns are one of those things I used to settle for, because the store options were either dry, crumbly, or weirdly sweet. If you have ever tried to load up a hot dog and had the bun crack down the side, you know the struggle. After one too many cookouts where my bun basically turned into a pile of bread dust, I started making my own. And honestly, once you do it a couple times, it feels way less intimidating than it sounds. These buns come out soft, a little springy, and sturdy enough to hold all the toppings without falling apart. 
Why make instead of buy?
I am not here to shame anyone for grabbing a bag from the freezer section. I do it too when life is busy. But when you want a bun that actually tastes like a bun, homemade makes a huge difference.
Here is what I noticed right away when I switched to baking my own gluten free hotdog buns:
Better texture: store bought gluten free buns can be dry or stiff, especially the next day. Homemade stays soft and tender.
No mystery ingredients: you can pick a flour blend you trust and skip stuff that bothers your stomach.
They hold up: these buns do not crumble the second you add mustard, relish, or a juicy sausage.
They are actually worth the effort: you can make a batch, freeze them, and then you have quick buns whenever you want.
Also, if you love baking other sandwich style breads, you might like these deliciously soft gluten free hamburger buns. I make both depending on what we are grilling that week.
“I made these for a family BBQ and nobody guessed they were gluten free. The buns stayed soft even after we loaded them with toppings. Total win.”

Tips for making buns
Gluten free baking has a learning curve, but hot dog buns are a great place to start because they are forgiving. I have made these when I am tired, distracted, and halfway through listening to a podcast, and they still came out good. Here are the little things that help a lot.
My go to tricks for soft buns
Use warm, not hot liquid: if you are using yeast, too hot will kill it. Think warm bath water.
Do not add too much extra flour: gluten free dough is usually more like a thick batter. If you keep adding flour until it looks like wheat dough, you will get dense buns.
Let them rise in a cozy spot: I like turning my oven on for 1 minute, then turning it off, then letting the pan sit in there with the door closed.
Shape with damp hands: this keeps the dough from sticking and helps you smooth the tops.
Do not overbake: baking too long dries them out fast. I pull them when the tops are lightly golden and they sound a bit hollow when tapped.
And one more tip that feels small but matters: let them cool before slicing. I know it is hard because the smell is amazing. But cooling helps set the crumb so you do not get a gummy center.
If you are on a bread kick like me, you can browse more ideas in this gluten free bread section. I scroll it when I need a new weekend bake.
Ingredients and substitution suggestions
Let me walk you through what I use and what you can swap if you need to. I have tested a few different combinations, and the big goal is always the same: a bun that is soft but not fragile. This recipe makes about 6 to 8 buns, depending on how big you shape them.
What you will need
- Gluten free flour blend (with xanthan gum if possible). Use a trusted all purpose blend made for yeast baking.
- Instant yeast (or active dry yeast). If using active dry, proof it in warm liquid first.
- Warm milk or unsweetened non dairy milk. Oat milk and almond milk work well.
- Egg for richness and structure. For egg free, use 1 tablespoon ground flaxseed mixed with 3 tablespoons warm water, but the buns will be a bit more tender and slightly less springy.
- Oil or melted butter. Butter adds flavor, oil keeps them soft longer.
- Sugar (just a little). This helps the yeast and keeps the buns from tasting flat.
- Salt. Do not skip it, gluten free dough needs the flavor boost.
- Apple cider vinegar or lemon juice. This helps with lift and balances flavor.
I also like adding a spoon of yogurt or dairy free yogurt sometimes for extra softness. It is optional, but it gives that bakery style bite.
How I make them at home
1) Mix your warm milk with sugar and yeast if you are using active dry yeast. Let it sit until foamy, about 5 to 10 minutes. If using instant yeast, you can usually mix it right in with the dry ingredients.
2) In a bowl, stir together flour blend and salt. Add yeast, then add egg, oil or butter, vinegar, and warm milk. Mix until you get a thick, sticky dough.
3) Let the dough rest for 10 minutes. This gives the flour time to hydrate, and it gets easier to shape.
4) Scoop and shape into bun logs. I like placing them on a parchment lined baking sheet, leaving space between each one. Smooth the tops with damp fingers.
5) Cover and let rise until puffy. Depending on the warmth in your kitchen, it can take 30 to 60 minutes.
6) Bake at 375 F until lightly golden, usually 18 to 24 minutes. Cool on a rack before slicing.
When you slice them, use a gentle sawing motion with a serrated knife. Gluten free bread can tear if you press down too hard.
Once you get the feel for it, you will want to make gluten free hotdog buns for more than just hot dogs. I have used these for bratwursts, veggie sausages, even as a quick sandwich roll.
Storage
Gluten free bread is at its absolute best the day it is baked, but you can still keep these soft if you store them the right way. I have learned this the hard way after leaving them on the counter in a towel and ending up with dry buns the next day.
Room temperature: Store fully cooled buns in an airtight container for up to 2 days. If your kitchen runs dry, add a paper towel in the container to help balance moisture.
Fridge: I usually avoid refrigerating bread because it can dry out faster, but if you need to, wrap each bun and rewarm before eating.
Freezer: This is the best option. Slice them first if you want easy grab and go buns. Wrap individually and freeze in a zip top bag for up to 2 months.
Reheating: My favorite method is a quick warm up in the oven or air fryer for a few minutes. If you are microwaving, wrap the bun in a damp paper towel and heat in short bursts so it stays soft.
Little tip: if you know you are grilling later, pull the buns from the freezer in the morning and let them thaw on the counter still wrapped. Then toast them lightly right before serving.
Related gluten-free recipes
When I make gluten free hotdog buns, it usually means we are in a fun, snacky mood. So I like to keep other easy gluten free recipes in rotation too, especially things that work for parties or family nights.
If you want more dinner inspiration, this gluten free recipes dinner collection is worth bookmarking. It is where I go when I am tired of the same meals.
And if you want something sweet after your cookout, I am obsessed with this quick dessert: 5 minute gluten free tiramisu. It is the kind of thing that makes people hover around the fridge for seconds.
Also, if you are building a whole gluten free bread lineup, try homemade pita sometime. It is surprisingly fast and fun: easy gluten free pita in 30 minutes.
Common Questions
Why are my buns gummy inside?
Usually they needed a little more baking time or they were sliced while still warm. Let them cool, and next time check your oven temp if you can.
Can I make the dough ahead of time?
You can mix it and keep it covered in the fridge for a few hours, but gluten free yeast dough is best baked the same day. If you want to prep ahead, bake and freeze the buns instead.
Do I have to use xanthan gum?
If your flour blend already includes it, you are good. If not, adding a small amount helps the buns hold together and stay soft.
How do I keep gluten free hotdog buns from crumbling?
Use a good flour blend, do not overbake, and store them airtight. Also, a little fat like oil or butter helps a lot with softness.
Can I make these dairy free?
Yes. Use unsweetened non dairy milk and oil or dairy free butter. The texture stays really nice.
A cozy little pep talk before you bake
If you have been disappointed by store buns, I really think you will love making your own gluten free hotdog buns. Keep it simple, let the dough rise until puffy, and do not rush the cooling step. If you want to compare methods or grab extra ideas, check out Gluten Free Hot Dog Buns (Classic Recipe) and Gluten Free Hot Dog Buns – Soft, Fluffy, & Easy! Life After Wheat. Then pick your favorite approach and make it your own. Once you taste a warm, soft bun that actually holds your hot dog, you will not want to go back.

Gluten Free Hotdog Buns
Ingredients
Dry Ingredients
- 2 cups Gluten free flour blend (with xanthan gum if possible) Use a trusted all purpose blend made for yeast baking.
- 1 packet Instant yeast (or active dry yeast) If using active dry, proof it in warm liquid first.
- 1 tablespoon Sugar Helps the yeast and keeps the buns from tasting flat.
- 1 teaspoon Salt Essential for flavor.
Wet Ingredients
- 1 cup Warm milk or unsweetened non-dairy milk Oat milk and almond milk work well.
- 1 large Egg For richness and structure. For egg free, use 1 tablespoon ground flaxseed mixed with 3 tablespoons warm water.
- 2 tablespoons Oil or melted butter Butter adds flavor, oil helps keep them soft.
- 1 tablespoon Apple cider vinegar or lemon juice Helps with lift and balances flavor.
Instructions
Preparation
- Mix warm milk with sugar and yeast if using active dry yeast. Let it sit until foamy, about 5 to 10 minutes.
- In a bowl, stir together flour blend and salt. Add yeast mixture, then add egg, oil or butter, vinegar, and warm milk. Mix until you get a thick, sticky dough.
- Let the dough rest for 10 minutes.
Shaping and Rising
- Scoop and shape into bun logs and place on a parchment-lined baking sheet, leaving space between each one.
- Cover and let rise until puffy, about 30 to 60 minutes.
Baking
- Preheat oven to 375°F and bake until lightly golden, usually 18 to 24 minutes.
- Cool on a rack before slicing.